
Getting Started with Blazor
Sunday, 01 June 2025
Blazor has rapidly evolved since its first release. What started as an ambitious experiment to bring C# to the browser using WebAssembly (WASM) is now a robust, feature-rich framework that I believe is the go-to choice for production workloads. It’s built into .NET now and isn’t going anywhere. In fact, at Build this year (2025) Microsoft has said that Blazor is now their preferred .NET web framework.
Blazor has shaken off its initial performance issues. It’s now more performant than ever. It continues to get better with each release of .NET, it’s gained major improvements in rendering, tooling, and ecosystem support. The recent additions, like Blazor United providing flexible render modes, mean Blazor can adapt to a variety of project requirements, from static sites to dynamic web apps and full-stack solutions.
Whether you’re coming from older .NET frameworks like ASP.NET MVC or Razor Pages or you’re using JavaScript frameworks, now is the perfect time to dive in and explore what Blazor offers. If you’re a .NET developer, I really recommend giving it a try. 👍
Blazor Render Modes Explained 🌀
Blazor apps can run in several "render modes," each with different strengths:
- Server: The UI is rendered on the server. Updates are sent over SignalR, keeping the browser UI in sync. Fast startup, but requires constant connection to the server. This is the easiest way to get started.
- **WebAssembly (WASM)😗* The app is downloaded and runs entirely in the browser via WebAssembly. No .NET server needed after initial load, but larger initial payload and slightly slower startup.
- **Auto: ** In Auto mode, Blazor will initially render using the Server mode, download the WASM runtime in the background, and then switch to this once it’s available.
- **Server-Side Rendering (SSR)😗* Pages are rendered as static HTML on the server, great for SEO and fast loading. You can always add interactivity later.
The biggest advantage to Blazor is you can mix and match the render modes. You can have certain components that are in interactive mode (Server/WASM) or you can have the whole application interactive from the start. Now, that’s not to say this doesn’t come with trade-offs, the biggest being that having hybrid render modes adds complexity. I’ll do a follow-up blog on using these hybrid modes.
Getting Started with Blazor 🛠️
For our demo today we’ll be using Blazor in Server mode (using SignalR). This is the easiest to set up and doesn’t require too much thought as everything is running on the server.
Prerequisites 📋
- .NET 8 SDK or newer
- Visual Studio 2022+ or VS Code with the C# Dev Kit extension
- MudBlazor for our UI components
Note: MudBlazor isn’t a requirement but it’s my favourite Blazor UI framework and I really recommend it.
Setup
First, we install the MudBlazor templates, then we use the dotnet CLI to create a new MudBlazor Server application.
dotnet new install MudBlazor.Templates

dotnet new mudblazor --interactivity Server --name BlazorApp --all-interactive
Project Structure and Core Files 🗂️
Let’s look at the essential files in a new Blazor app:
App.razor
This is the entry page to our application for a Blazor Server app. Blazor WASM is slightly different, which we’ll cover in a separate blog. What this page does is outline our base HTML template. We have all our CSS and JavaScript files as well as some important Blazor tags. <HeadOutlet> allows us to dynamically add elements to the head of a page. The <Routes> tag loads the Route.razor component, which essentially bootstraps our application.
<!DOCTYPE html>
<html lang="en">

<head>
    <meta charset="utf-8" />
    <meta name="viewport" content="width=device-width, initial-scale=1.0" />
    <base href="/" />
    <link href="https://fonts.googleapis.com/css?family=Roboto:300,400,500,700&display=swap" rel="stylesheet" />
    <link href="@Assets["_content/MudBlazor/MudBlazor.min.css"]" rel="stylesheet" />
    <ImportMap />
    <link rel="icon" type="image/ico" href="favicon.ico" />
    <HeadOutlet @rendermode="InteractiveServer" />
</head>

<body>
    <Routes @rendermode="InteractiveServer" />
    <script src="_framework/blazor.web.js"></script>
    <script src="@Assets["_content/MudBlazor/MudBlazor.min.js"]"></script>
</body>

</html>
Routes.razor
The Router component acts as our bootstrap component. This is a very basic example that loads our primary Layout (MainLayout) and will attempt to focus on the first H1 tag on the page. We can do a lot more with this component, if for example, we wanted to have 404 page not found logic, we could set that up here. This is also where we would configure some of our authentication logic if we needed to (more on that in a follow-up blog).
<Router AppAssembly="typeof(Program).Assembly">
    <Found Context="routeData">
        <RouteView RouteData="routeData" DefaultLayout="typeof(Layout.MainLayout)" />
        <FocusOnNavigate RouteData="routeData" Selector="h1" />
    </Found>
</Router>
Program.cs
This is the main entry point for our application. This is very similar to other .NET projects. It allows us to define our services for DI (Dependency Injection) as well as any other setup that we need for our App. Again, this would differ for a WASM standalone Blazor App, but not by much.
In this file we set up some MudBlazorServices, which are needed for things like toasts and other dynamic events. We also tell our app that we want to run in the Interactive Server mode.
using MudBlazor.Services;
using BlazorApp.Components;

var builder = WebApplication.CreateBuilder(args);

// Add MudBlazor services
builder.Services.AddMudServices();

// Add services to the container.
builder.Services.AddRazorComponents()
    .AddInteractiveServerComponents();

var app = builder.Build();

// Configure the HTTP request pipeline.
if (!app.Environment.IsDevelopment())
{
    app.UseExceptionHandler("/Error", createScopeForErrors: true);
    // The default HSTS value is 30 days. You may want to change this for production scenarios, see https://aka.ms/aspnetcore-hsts.
    app.UseHsts();
}

app.UseHttpsRedirection();

app.UseAntiforgery();

app.MapStaticAssets();
app.MapRazorComponents<App>()
    .AddInteractiveServerRenderMode();

app.Run();
MainLayout.razor
The MainLayout.razor page provides all the boilerplate for our Blazor App. This is where we create the basic outline for our App. At the start, we add some of the MudBlazor components to allow things like theming, Dialogs, etc. This won’t really be covered in this blog but trust that these are important for some of the MudBlazor components.
This is also a great example of how Blazor allows you to combine HTML/Razor with C#. In this page, we have our HTML/Razor at the start, followed by a @code block. This code block is where we put all our C# logic; in some cases, this can be moved to a separate file if you want to keep your C# and Razor separate (I’ll cover that in a later blog).
@inherits LayoutComponentBase

<MudThemeProvider Theme="@_theme" IsDarkMode="_isDarkMode" />
<MudPopoverProvider />
<MudDialogProvider />
<MudSnackbarProvider />

<MudLayout>
    <MudAppBar Elevation="1">
        <MudIconButton Icon="@Icons.Material.Filled.Menu"
                       Color="Color.Inherit"
                       Edge="Edge.Start"
                       OnClick="@((e) => DrawerToggle())" />

        <MudText Typo="Typo.h5" Class="ml-3">Application</MudText>

        <MudSpacer />

        <MudIconButton Icon="@(DarkLightModeButtonIcon)"
                       Color="Color.Inherit"
                       OnClick="@DarkModeToggle" />

        <MudIconButton Icon="@Icons.Material.Filled.MoreVert"
                       Color="Color.Inherit"
                       Edge="Edge.End" />
    </MudAppBar>

    <MudDrawer id="nav-drawer"
               @bind-Open="_drawerOpen"
               ClipMode="DrawerClipMode.Always"
               Elevation="2">
        <NavMenu />
    </MudDrawer>

    <MudMainContent Class="pt-16 pa-4">
        @Body
    </MudMainContent>
</MudLayout>

<div id="blazor-error-ui" data-nosnippet>
    An unhandled error has occurred.
    <a href="." class="reload">Reload</a>
    <span class="dismiss">🗙</span>
</div>
How Navigation Works in Blazor 🧭
In Blazor, pages are defined using Razor components with the special @page directive at the top of the file. This directive tells Blazor that the component should be treated as a routable page and specifies the URL route that will trigger the component, for example, @page "/weather" means the component responds to the /weather URL. You can have multiple @page directives in a single component to allow it to handle multiple routes. The @page directive is essential for enabling navigation within your Blazor app. Alongside this, the <PageTitle> component is used within the markup to dynamically set the browser’s title when the page is active, improving user experience and making your app feel more like a traditional web application. This allows each page to have a context-appropriate title, which is especially useful for accessibility and search engine optimisation (SEO).
@page "/weather"
<PageTitle>Weather</PageTitle>

<MudText Typo="Typo.h3" GutterBottom="true">
    Weather forecast
</MudText>
Links
Blazor’s navigation works in a way that will feel familiar if you’ve used JavaScript libraries like React or Angular. Navigation is handled through components like MudNavLink (from MudBlazor) or the built-in NavLink in vanilla Blazor. These components generate anchor tags that let users move between different pages of your application without a full page reload, creating a seamless single-page app experience. Each link corresponds to a route defined by the @page directive in a Razor component. You can specify icons, labels, and set matching criteria, such as Match="NavLinkMatch.All" or Match="NavLinkMatch.Prefix" to control when a navigation link is considered active. This allows you to style or highlight the current page in your navigation menu, giving users clear visual feedback about where they are in the app. Under the hood, the Blazor router tracks the browser’s URL and determines which component to render for each route, making navigation both efficient and intuitive.
<MudNavMenu>
    <MudNavLink Href="" Match="NavLinkMatch.All" Icon="@Icons.Material.Filled.Home">
        Home
    </MudNavLink>

    <MudNavLink Href="counter" Match="NavLinkMatch.Prefix" Icon="@Icons.Material.Filled.Add">
        Counter
    </MudNavLink>

    <MudNavLink Href="weather" Match="NavLinkMatch.Prefix" Icon="@Icons.Material.Filled.List">
        Weather
    </MudNavLink>
</MudNavMenu>
Blazor also provides you a way to programmatically control navigation. You can achieve this using NavigationManager, which allows you to do complex routing logic such as navigating to different pages based on some condition.
@inject NavigationManager Navigation

<MudButton Color="Color.Primary"
           Variant="Variant.Filled"
           @onclick="IncrementCount">
    Click me
</MudButton>

<MudButton Color="Color.Secondary"
           @onclick="GoToAbout">
    Go to About
</MudButton>

@code {
    private int currentCount = 0;

    private void IncrementCount()
    {
        currentCount++;
    }

    // Only go to About if count is greater than 0
    void GoToAbout() =>
        currentCount > 0
            ? Navigation.NavigateTo("/about")
            : Navigation.NavigateTo("/error");
}
JavaScript Interop ⚡️
Blazor can’t do everything by itself, mostly due to limitations in how WASM works rather than an issue with Blazor. But this isn’t a problem as Blazor has full support for interacting with JavaScript to do things in the browser that it can’t do on its own. For this, we use the JavaScript Interop to pass data and call methods, what’s great is it works both ways. You can have C# code that calls JS functions, and you can also have JS functions that call C# code.
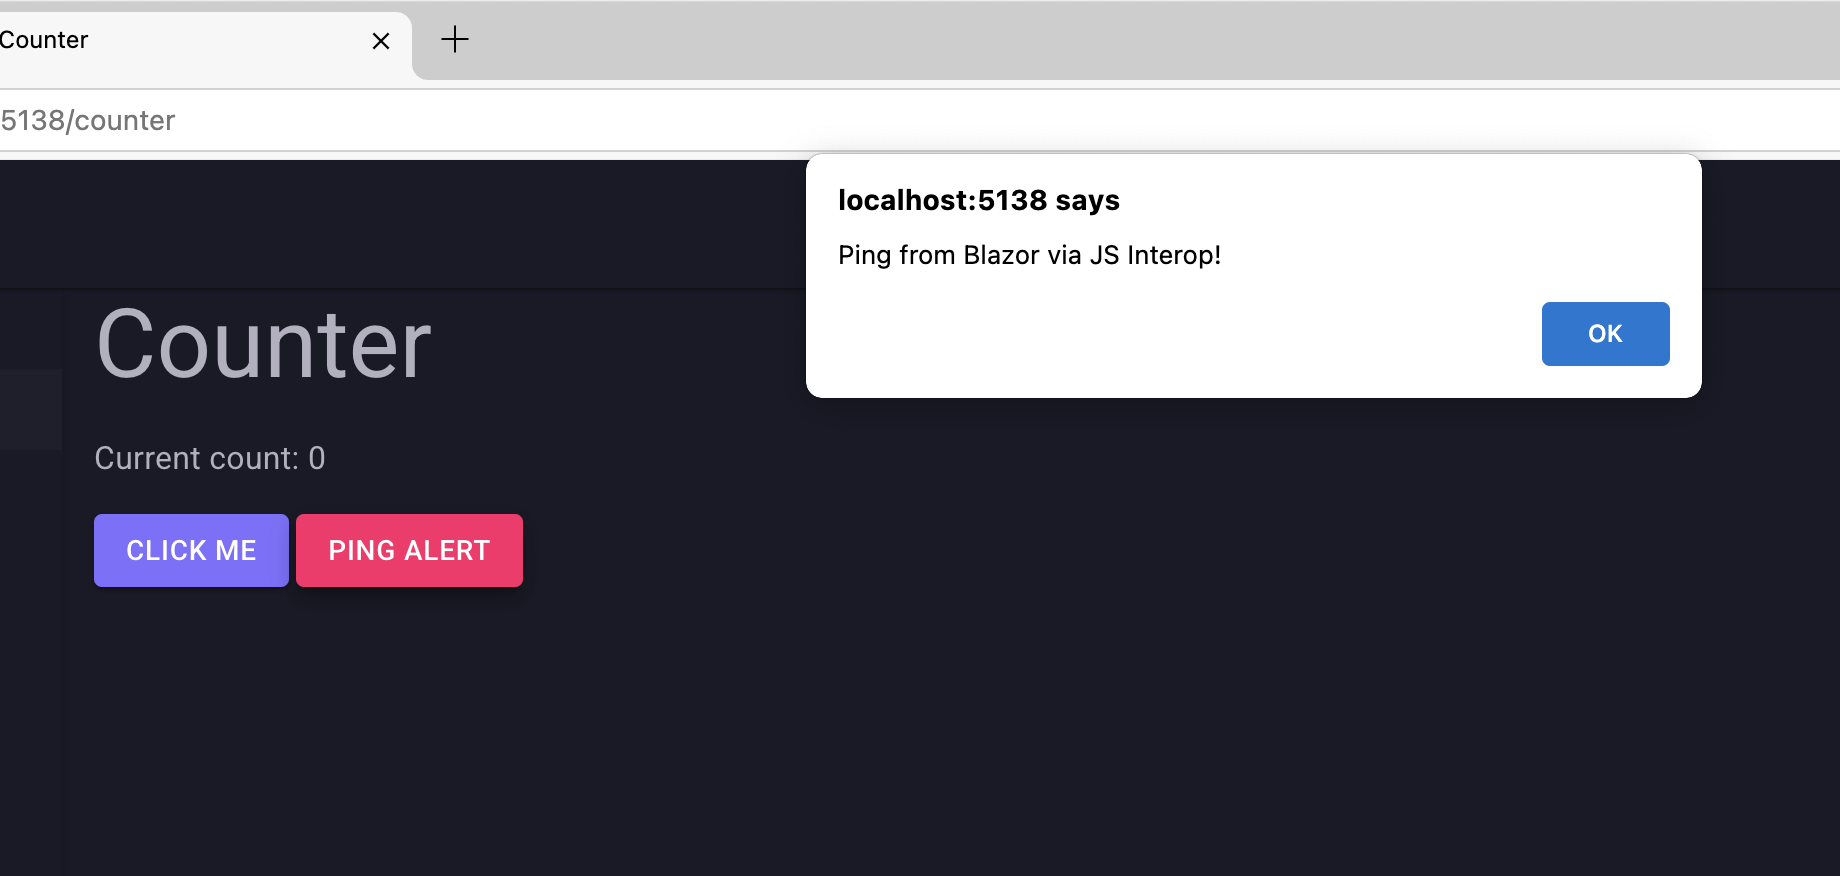
So how do we do this? Here’s an example of how you can use the JS interop to trigger an alert in the browser (classic demo!):
@page "/counter"
@inject IJSRuntime JS

<PageTitle>Counter</PageTitle>

<MudText Typo="Typo.h3" GutterBottom="true">Counter</MudText>

<MudText Typo="Typo.body1" Class="mb-4">
    Current count: @currentCount
</MudText>

<MudButton Color="Color.Primary"
           Variant="Variant.Filled"
           @onclick="IncrementCount">
    Click me
</MudButton>

<MudButton Color="Color.Secondary"
           Variant="Variant.Filled"
           @onclick="ShowAlert">
    Ping Alert
</MudButton>

@code {
    private int currentCount = 0;

    private void IncrementCount()
    {
        currentCount++;
    }

    private async Task ShowAlert()
    {
        await JS.InvokeVoidAsync("alert", "Ping from Blazor via JS Interop!");
    }
}
In this example, we first inject the IJSRuntime, this is provided by Blazor and .NET. In our @code block, we can call into it using the JS.InvokeVoidAsync() method. The first parameter is the function we want to call, the second is the arguments to pass into that function. Now, when we click the “Ping Alert” button, we get the alert in the browser. 🛎️
Final Thoughts 💡
Hopefully this blog has shown you how far Blazor has come and more importantly how Blazor is more accessible and flexible than ever. It is a very viable platform with real productivity benefits for .NET developers. The ecosystem is growing fast, there are lots of components, templates, and learning resources out there.
If you haven’t tried Blazor yet, now’s a fantastic time to jump in. You can build everything from prototypes to production apps, with powerful integration between C#, .NET, and the web. It really is a fantastic way to create interactive or static web apps with all the power of .NET at your fingertips.
Let’s build something great 🚀
Comments (0)
No comments yet. Be the first to comment.
Subscribe so you don't miss out 🚀
Be the first to know about new blog posts, news, and more. Delivered straight to your inbox 📨